
Caring for Teak Garden Furniture
Teak is tough. It’s naturally oily, densely grained, and shrugs off British weather for years with minimal maintenance. Left alone, it will silver beautifully and still last many years. We get a lot of questions about “maintenance,” though – especially from people who prefer that new-teak yellow hue. Here’s how to bring it back if and when you feel like it.

Want the yellow/honey colour back?
You do not have to do all below three steps every time. Pick what’s needed based on how your furniture looks. Often Step 1 alone is enough; sometimes you’ll do 1 + 3; occasionally you’ll run through all three for a full refresh.
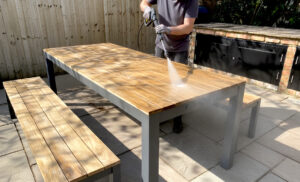
Step 1 — Light Jet Wash (to clear dirt and organic build-up)
A quick, careful jet wash cleans the surface and opens the pores so oil can penetrate evenly.
How to do it right
-
Use a normal jet-wash (no harsh pencil jets).
-
Keep pressure modest and stand back 30–45 cm. Keep the lance moving with the grain.
-
Pre-wet the surface to soften any dirt, then make smooth passes from top to bottom. Avoid concentrating on one spot, and go easy around joints and end grain.
-
If you don’t have a washer, a bucket of warm soapy water and a soft brush also works – just rinse well.
After washing: Let the teak dry fully (ideally overnight in dry weather). If the grain feels a bit “hairy,” a quick sand (Step 2) will knock it back to smooth in minutes.
Tip: Dealing with algae or black specks? Do the jet wash first, then treat stubborn patches with a dilute oxalic/“brightener” or patio cleaner, rinse thoroughly, and let dry before moving on.
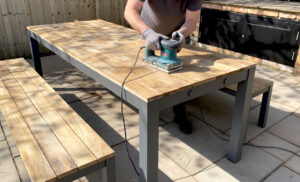
Step 2 — Gentle Sand (for smoothness and even colour)
This is about feel and finish, not removing lots of material.
Tools & grits
-
By hand: 120 → 180 grit sanding block, always with the grain.
-
Power: An electric sander makes very light work on flats—ideal for our dining tables and benches. Use dust extraction if you have it.
Technique
-
Light, even passes. Don’t hover on edges or you’ll round them over.
-
Feather out any spot repairs so you don’t create “clean patches.”
-
Brush/vacuum dust from slats and joints; wipe with a barely damp cloth; allow to dry.
If your table already feels smooth after the jet wash, you can skip sanding and go straight to oil.
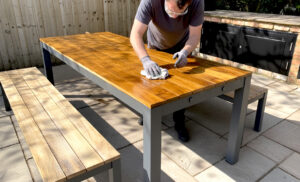
Step 3 — Teak Oil Application (rag on, wipe off; repeat if needed)
Oil revives the warm tone and adds water repellency. Dry teak will drink it fast—don’t be surprised.
What you’ll need
-
A good quality teak oil.
-
Lint-free rags or applicator pads.
-
Optional: a spray applicator for complex, non-flat pieces (chairs with spindles, planters, etc.).
-
Gloves—and a metal bin/water bucket for safe rag disposal.
Method (flat surfaces)
-
Stir the oil. Work in the shade on a cool, dry day.
-
Thin coat with a rag, working with the grain. Aim for damp—not wet.
-
Wait 10–15 minutes, then wipe off every bit of excess. No wet patches, no tacky film.
-
If the wood is very dry, apply a second light coat the same day. Stop when the surface looks even and won’t take more.
Method (complex shapes)
-
Lightly mist oil into nooks with a hand sprayer, then back-brush/back-rag to work it in and remove excess.
-
Guard against overspray on paving, fabric, or glass; keep a dry rag handy for drips.
Drying & use
-
Follow the product label, but as a rule of thumb, allow several hours before light use and a full day before cushions. Don’t trap fresh oil under covers.
Do you need to do all three? No.
-
Looks a bit grubby but colour’s fine? Do Step 1 only.
-
Clean but a tad rough? Do Step 2 only, or 2 → 3.
-
Clean and smooth but faded? Skip straight to Step 3.
-
You like the silver patina? Do none of the above—just a wash now and then.
You’re in charge. This is cosmetic maintenance, not a survival checklist.
How often should you do this? Only when you feel like it.
There’s no fixed schedule. Some customers refresh once a year, others every 2–3 years, many never. Let the wood tell you:
-
Water stops beading immediately.
-
The colour looks patchy or “dry.”
-
You’ve got guests and want it looking sharp next weekend.
Otherwise, leave it. Teak doesn’t need babysitting.
A few extra, useful pointers
-
Test first. Try your full process on the underside of a seat or leaf extension.
-
Work clean. Dust and old oil left on the surface cause blotches—wipe between steps.
-
Edges & end grain drink more oil; apply sparingly and wipe thoroughly to avoid dark halos.
-
Hardware check. After a deep clean, nip up bolts/screws; swap to marine-grade stainless in coastal spots if needed.
-
Covers. Use breathable covers if you want to keep bird mess off, but never trap wet, freshly-oiled timber under plastic.
-
Alternative to oil. If you want the brown tone with less frequent top-ups, a water-based teak sealer is a good option. If you’re happy with silver, just wash and walk away.
Quick shopping list
-
Pressure washer with fan nozzle (or bucket + soft brush).
-
120 & 180 grit sandpaper, sanding block / electric sander.
-
Teak oil, lint-free rags, optional spray applicator.
-
Microfibre cloths, gloves.
Bottom line
Teak is low-maintenance by design. Refresh the look when you want to—a light jet wash, a quick sand, and a wipe of oil are simple, optional steps. Do one, two, or all three, as needed. The furniture won’t mind either way; it’s built to last.


